Are you interested in a really cool project to get your closet more organized? Well, you may already have arranged your neckties but check out this wooden tie rack hanger. This could fascinate you and think of making your own.

Wooden Tie Rack Hanger To Get You More Organized
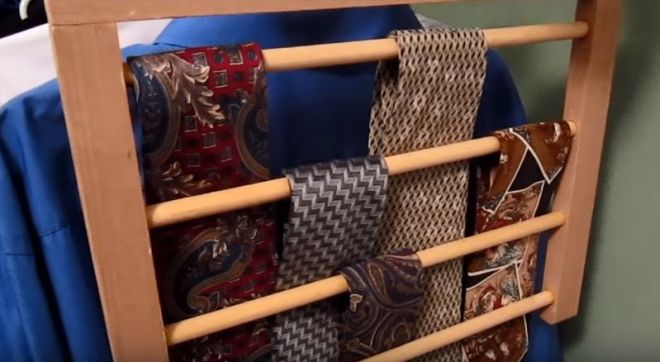
How To Make A Classy Necktie Organizer
Hanging neckties using a plastic hanger is a thing of the past. There are so many ways that you can organize your ties but there’s this one project that I found enthralling that you might be interested as well. It’s a neat design for a tie hanger and quite simple to make. If you enjoy woodworking, this is definitely a project I would recommend to spend some of your time. It’s stylish, functional, and a good way to organize your ties.
Materials needed:
- 3/4″ stock wood
- 3/4″ x 1 wood of your desired length for side pieces
- 1/2″ diameter dowel rods
- measuring tape
- jig saw machine
- sandpaper
- electric drill
Instructions:
Step 1. Cut a Wood Hanger

Download the PDF drawing from this link, and cut a wood hanger from 3/4″ stock wood.
Step 2. Cut the Side Pieces

Cut two 3/4″ x 1″ side pieces to your desired length depending on the number of ties you have.
Step 3. Drill holes on the side pieces

Drill 1/2″ deep holes down one side of each tie piece to accept the rods. Space the holes 3″ apart on the center.
Step 4. Cut the Dowel Rods

Cut the 1/2″ Dowel Rods to 14″ long.
Step 5. Sand and Assemble


Sand all the pieces and assemble.
Step 6. Screw the Side Pieces

Screw the side pieces to both ends of the hanger to secure.
You’re all set and good to go!

Watch this video by Steve Carmichael for a clearer view of the entire woodwork.
So now you’re done with your classy wooden tie rack hanger. How cool is that? Not everybody has the same tools used in the video but surely there are ways you can improvise. For those who have tools like Steve, start the project and enjoy the woodwork challenge. This tie rack design will certainly look good in any closet.
Check out for more related topics here.
Like this? You’ll also like…
9 EXPENSIVE MEN’S WATCHES WITH STAGGERING PRICE TAGS
QUICK AND EASY WAY TO RESTORE CHROME ON CAR WHEELS
A LOOK INSIDE THE WORLD’S MOST LUXURIOUS AIRLINES


Pingback: 4 Easy Steps To Creating Your Posh DIY Hanger Wardrobe Organizer